
The material costs for a wooden terrace mainly depend on the type of wood chosen and the desired substructure.
The cheapest tropical woods are Bangkirai and Garapa. European larch wood and Douglas fir wood are not quite as durable, but they are also significantly cheaper. One of the most expensive variants is Ipe, a very durable, heavy tropical wood. You can assume the following guide prices:
- Ipe decking (21 x 145 mm): 75–85 euros / m2
- Bangkirai decking (21 x 145 mm): 45–55 euros / m2
- Larch decking (27 x 145 mm): 17-25 euros / m2
- Douglas fir decking (26 x 120 mm): 15–20 euros / m2
- The purlins for the substructure of the wooden terrace should always be made of the same type of wood as the boards so that both last the same time.
- Construction timber (70×70 mm): 13–15 euros per running meter
- Construction timber from Bangkirai (42×65 mm): 9–11 euros per running meter
- Larch construction timber (45×70 mm): 3.50–4.50 euros per running meter
Construction timber made of Douglas fir (40×68 mm): 3–4 euros per running meter
By far the largest part of the costs is covered by purchasing wood. The following costs apply for the rest of the required material:
- Terrace screws made of V2A steel (5.0×50 mm): approx. 20 euros / 100 pieces
- Gutter stones (16x16x12 mm): approx. 1 euro per piece
- Dry concrete for foundations (e.g. “quick-mix”): approx. 7 euros per foundation
- Filling sand: approx. 6–10 euros per cubic meter
- Pond liner (EPDM, 1mm thick): 11-14 euros per square meter
- Weed control (90 g / m2): approx. 2–3 euros per square meter
- If you build the wooden terrace yourself, you should take into account rental fees for powerful cordless drills and screwdrivers with exchangeable batteries. The investment is worthwhile, because experience shows that simple do-it-yourself tools quickly fail, especially when processing heavy tropical wood.
You will find numerous interactive tools on the Internet with which you can configure your wooden terrace, sometimes even including furniture and decoration. The OBI garden planner, for example, is helpful. You will not only find inspiration for your wooden terrace, but you can also design your own individual terrace from different materials and colors. You will also receive suitable self-assembly instructions and a list of materials and you can keep an eye on the costs at every step.
If you have your wooden terrace built by a professional, there are of course not only the material but also the costs of the craftsmen. For an average wooden terrace (approx. 15 to 20 square meters), calculate around 40 working hours at 50–60 euros.
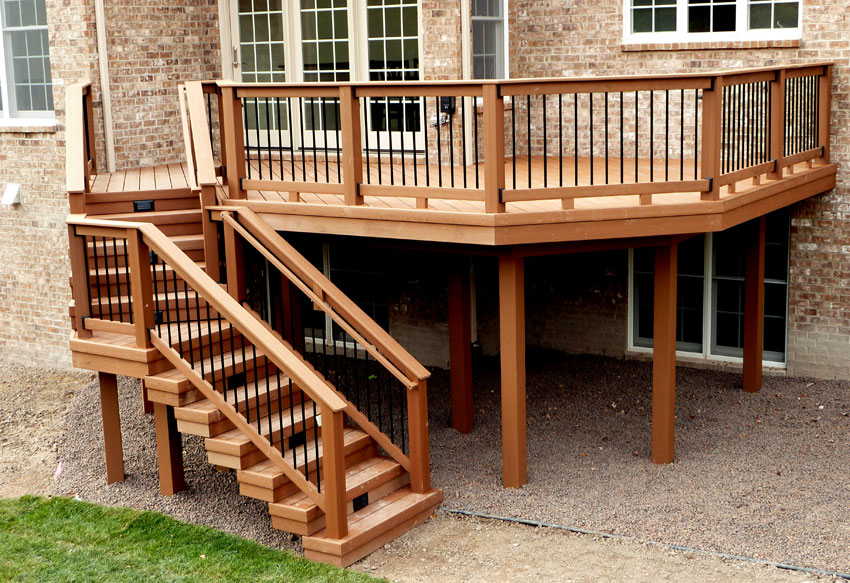
The Height Of The Wooden Terrace
Measure the height of your wooden terrace very carefully. Especially with wooden terraces on the house you usually have predetermined heights such as the threshold of the terrace door. It should be level with the decking so that there are no dangerous tripping hazards. Rule of thumb: either an exact height connection or a clearly visible step. Of course, light shafts for cellars should not be built over with the wooden terrace. In the case of ground-level wooden terraces in the garden, the subsurface must be excavated correspondingly deeper than in the case of wooden terraces that protrude above the surface of the earth and are closed with a plinth.

If the wooden terrace is not covered, you should build a slight slope of about one percent (one centimeter per meter) along the wooden floorboards so that the rainwater can run off along the longitudinal grooves. This is especially important in shady areas, where the terrace does not dry out so quickly. The longer the moisture can stay on the wood, the shorter the service life of the terrace covering. In addition, algae can settle over time and make the surface very slippery.
Distance From The Wooden Terrace To The House Wall
Many building instructions recommend screwing the first support beam directly to the house wall. We advise against this for two reasons: On the one hand, dirt and rainwater collect in the groove between the wall and the wood – an ideal breeding ground for wood-destroying fungi. On the other hand, the wood works and expands when it is damp. A firm connection to the house wall can cause tensions in the wood that lead to cracks or bulging. The same applies to the wooden planks: They should therefore be laid at least five millimeters away from the house wall – especially if they are parallel to the wall.
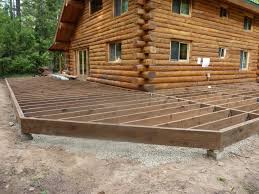
The Substructure Of The Wooden Terrace
The most difficult work step when building a wooden terrace is the support structure. There are different construction methods, from simple concrete stone substructures to point foundations with beam supports. We recommend a substructure with concrete blocks on small foundations. It is inexpensive and not so rigid because the beams lie on the stone without any further fastening so that the wood can work.
The OBI experts show you in the video how to build a substructure with a gravel bed and support pads.
Before you start, you should mark out the intended area for the wooden terrace at the corners with metal rods and mark the height of the upper edge of the support beam with a circumferential cord, taking into account the required slope. The height corresponds to the final height of the terrace minus the thickness of the decking boards. Then cover the entire area and replace the topsoil with about 10 to 15 centimeters of filler sand. The floor height after preparing the subfloor depends on the desired terrace height: If the terrace covering is to be above the floor level, including the side screen, as in our example, the prepared subfloor must be about ten centimeters lower than the floor surface.
Place Foundations And Base Stones
Now, according to your construction drawing, dig around 20 x 20 cm and 40 cm deep foundation holes along the upper edge at a distance of no more than one meter from hole center to hole center. If you want to make your work a little easier, you can also use an auger. The devices can be borrowed from hardware stores.
Fill the foundation holes in rows with earth-moist concrete and compact it thoroughly. Then lay a synthetic fleece over the finished foundations as protection against weed growth and place a concrete base stone on each foundation. Square gutter stones in the format 16 x 16 x 12 centimeters are best suited for this. They are also known as basament stones and are used in road construction for pavingthe lateral drainage channels next to the Bürgerstelg. Tension a second cord that runs level with the lower edge of the later support beam and align the basement stones in rows exactly at this height. To do this, you either have to line them with additional concrete or knock them down with a rubber mallet. Also use a spirit level to check that each base stone is level. Using this principle, you also lay the foundation rows for the remaining support beams with a maximum of sixty centimeters.
Put On The Gravel And Put On The Support Beam
When the concrete has hardened, you should cover the entire area with a layer of gravel about two inches high. This so-called blinding layer ensures that the rainwater quickly seeps into the ground and the humidity does not become too high, which increases the service life of the terrace covering. Then place the support beams at the exact distance after you have cut them to the correct length with a saw. You should put a 16 x 16 cm piece of pond liner with a smooth surface between the beam and the base stone. It ensures that no moisture is drawn into the stone. If necessary, you can compensate for slight height tolerances with several layers of pond liner. tip: If you have to put two support beams butt joint because they are not long enough, you should connect them together. It is best to use perforated plates made of stainless steel, which you screw on on both sides. For static reasons, the connection should rest on a base stone.
Lay The Floorboards Of The Wooden Terrace
Start installing the decking at one end and find one that is as straight as possible. Place this on the supporting structure and align it exactly at right angles and, if necessary, at the recommended distance from the house wall. If the boards in the sawmill have not been cut cleanly and at right angles, you should trim one end with a miter saw before laying. Then fasten the board to each support beam at the front and back with a screw each so that the wood cannot bulge when it is damp.
Care is required when screwing to the support beam: For optical reasons, all screws should be exactly in line. A taut mason’s cord is very helpful as a guide . You should at least pre-drill the screw holes of every decking board for hard tropical wood. The drill bit must be one millimeter larger than the screw so that the wooden planks can work and are not under too much tension.
Attach a special countersink to the drill with a clamping screw. The recess for the screw head is milled out in one operation. Some screw manufacturers include a suitable drill bit with countersink in the screw package. To screw in the screws, it is best to use a powerful cordless screwdriver with a suitable Torx attachment and exchangeable battery, because experience has shown that the power storage is quickly exhausted, especially with tropical wood. Incidentally, the screws are easier to screw in if you dip them briefly in vegetable oil beforehand.
In order to maintain an exact plank spacing of five millimeters everywhere, you should work with spacers made of hardwood or plastic. They are inserted into the joint at the front, in the middle and at the back before the plank is screwed on. If the distance varies because a decking board is not completely straight, use a lever clamp or a tension belt. So you can easily press the board into the correct position. After screwing, you can usually only get the spacers out again with pliers. Recommend thick polyamide plastic washer into every screw connection between the board and the support beam. This has the advantage that the boards and joists have no contact surfaces and dry out more quickly after rainfall. However, due to time constraints, this technology is rarely practiced even by professional companies today.
Straight Edge
In order to get a straight edge , it has proven useful to let the decking protrude a little at one end and then to bring it to a uniform length with a hand-held circular saw. Before sawing, fix a guide rail with the help of screw clamps so that the edge is exactly straight. Of course, you have to measure the guide rail so that the boards protrude the desired length over the support beams.
Large Wooden Terraces: Lay The Planks Together
With large wooden decks, the construction becomes a bit trickier because the boards are not long enough to cover the entire terrace. In order to still achieve an appealing overall picture, you have to take this into account when designing the substructure: Place two support beams next to each other on the base stone at points where a new board is to be added, about three to four centimeters apart. Now start each new row alternately with a longer and a shorter board, so that two rows of butt joints are staggered. Make sure that the joints are at least five millimeters wide and that the screws are exactly in line.
Depending on the construction, you can either surround the wooden terrace with a paved edge or – for slightly elevated seats – attach a plinth panel so that the substructure cannot be seen. The plinth panel must be below the decking so that the water drainage is not impaired. Use decking boards for the cover as well and cut them to the correct length. They are then fixed to the side of the support beam with stainless steel screws. Ideally, the panel should be flush with the terrace edge without any offset. If the distance from the longitudinal beam to the terrace edge is too great, you can, for example, insert suitable wooden blocks as spacers and fix them with stainless steel angles.
Remaining Work
Finally, check all the screws on the wooden terrace again and tighten them if necessary so that the screw heads do not protrude. Then all corners and edges are sanded with emery paper and a sanding block or orbital sander so that you can walk on the terrace barefoot without injuring yourself on wood splinters. Finally, all you have to do is clear the area of wood and metal shavings with a broom – and you can plan the housewarming party for your new wooden terrace.